Hardware:
Software:
Developpement:
Gallery:
|
BOB4 - Autonomous indoor helicopter UAV
Algorithms - 2/2 :
2) Control loop:
2.1) PID Controller (Proportional Integral Derivative)
In my UAV, I control 4 orders, that correspond to the 4 channels of the original Radio Control. I use 4 independent PID controllers.
|

|
For longitudinal and lateral displacement, I need a little bit more geometry. I compute the 2D position and speed error in the UAV frame of reference, from the 2D position and speed error already computed in the absolute frame of reference.
All these geometry can look too much complex, and require a lot of computing power...
But this is a choice: With it, I can directly work at the absolute frame of reference. I directly sends 3D coordinates in this frame. All the algorithm takes that naturally. The algorithm automatically adapts itself to the UAV orientation, and to the sensor used (sonar, Wii camera). This very appreciable. The algorithm is therefore quite flexible, and can easily adapt to a new situation, a new scenario.
For the yaw controller, the motor controller (from E-Sly) already has a gyroscope inside, that already makes a correction of the yaw error. Therefore, for the yaw channel, I have to remove the derivative term of the PID. This is only a PI for the yaw channel. The motor controller also makes the mixing for the 2 motors, and I just have to send throttle and yaw orders.
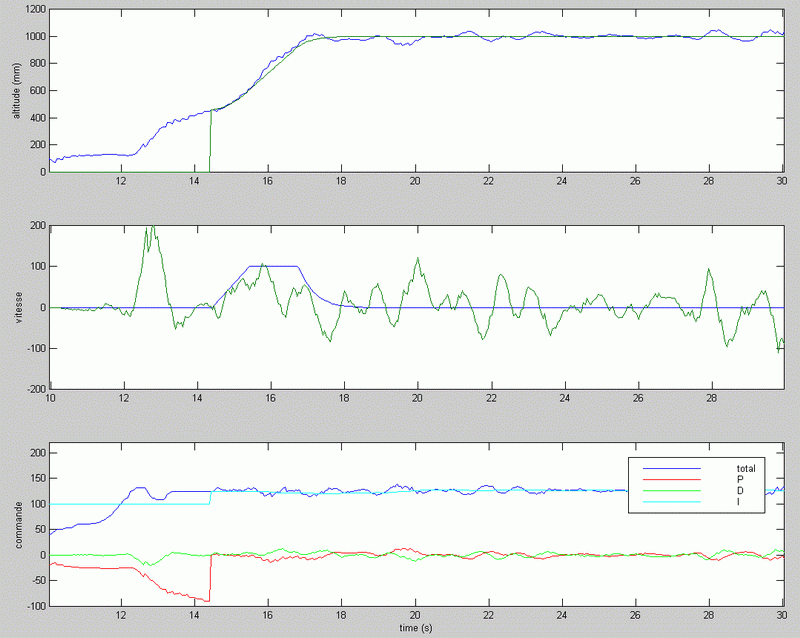
Here is an example of log for tuning the altitude PID:
|

|
2.2) Setpoint smoothing:
In order to have a smooth displacement, and in order for the controller to follow the setpoints, I cannot switch instantaneously between 2 setpoints separated from several meters for example. The setpoint is therefore decomposed, smoothed. The 3D setpoint has a smooth displacement, with a maximum speed. I only programmed a speed limitation, and not acceleration limitation (= speed ramps = trapezoidal speed), because it was not necessary.
This decomposition is computed in real time. This means that the final goal can be switched at any time, even during a displacement. The decomposition naturally continues to the new goal.
|
3) High level - supervisor:
This part is called supervisor. It consists in setting the setpoints for the PID. The setpoints are directly set at the absolute frame : 3D position and yaw orientation. Therefore, this part is very simple, and do not worry about which sensor is used. During a displacement, the sensor used can vary (switch from sonar to wii camera) without any influence on the way to give setpoints.
The supervisor is called if one of the following events occurs:
- Switching from manual to automatic control
- Switching from automatic to manual control
- Setpoint reach for all 4 PID
- Impossible to estimate position
|
4) Tasks sequencer:
This part is the sequencer. This allow to call the different parts of the software regularly, but at different frequencies. I do not use the "threading" capability of the ".Net MicroFramework", because it uses too much computing power. Even without this functionality, this part is very easy to program, because almost all tasks are called at a fixed period, and are called systematically (except the supervisor).
Here is a list of the software tasks called by the sequencer:
|

|
5) Transition between autopilot and manual control :
These transitions are managed by the supervisor and the sequencer. A dedicated push is located on the Radio Control, and enables to trigger some actions, without releasing the joysticks. When this push is pressed, I can trigger several actions, depending on the situation:
- When motors are off, I make a re-initialization of the UAV : all parameters are set to their initial values, without the need to reset the board. Reseting the board would take more time : 15 to 20 seconds.
- When motors are off but the UAV lays on the ground : I trigger a take off. And then, the supervisor conducts the programmed scenario in autopilot mode.
- When flying : the supervisor conducts the programmed scenario in autopilot mode. If it was already in autopilot mode, then the scenario is rewound from the initial action.
A movement of one of the joystick (one of the 4 channels) immediately deactivates the autopilot mode, and the user has manual control. Therefore, there is no need to press a button or a switch. This is a natural way to take control of the UAV. But I have to be careful : the manual recovery can be rough.
Fail-Safe (software):
If one information fails (sensor failure, connector disconnected), then the software decides to go immediately to manual control, and forbid automatic control. This did not took place often, but this surprises!
Before I programmed this fail safe, I encountered one situation that frightened me: as a result of a very strong landing, the 2 boards disconnected from each others. The motherboard did not have information from any sensor anymore. As a result, the PID immediately saturated. The throttle and yaw order immediately went to MAXIMUM position! I just had enough time to react rapidly. But I realized that a fail-safe was missing on my software.
|
|
|

